
Chimney Roof Leak Repair in Las Vegas, Henderson & North Las Vegas
Chimney roof leak repair Las Vegas is one of the most common services we provide for homeowners dealing with water stains, leaks around the chimney, and water dripping into patios or living rooms. If you see water marks near your fireplace, on the ceiling by the chimney, or under your patio roof, there’s a high chance the problem starts with a chimney roof leak that needs professional repair.
When water starts showing up around your chimney, fireplace wall, or patio ceiling, it almost never “just goes away.” In Las Vegas, our tile and shingle roofs hide a lot of damage: rotten wood, ruined underlayment (“paper”), and rusted flashing that you can’t see from the ground.
This page is all about chimney roof leaks:
leaks around stucco chimneys and framed chimneys
leaks where the patio roof ties into the house or chimney
leaks that show up inside the house around the fireplace, TV wall, or ceiling
We’ll explain what’s going on, how we repair it, and why it’s not enough to just throw some caulking on it and hope for the best.
Common Signs of a Chimney Roof Leak
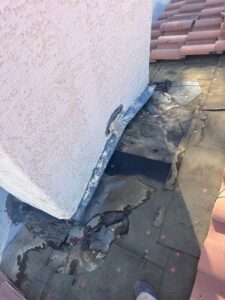
You don’t have to be a roofer to know something is wrong. Here are typical signs we see on jobs all over Las Vegas, Henderson, and North Las Vegas:
Inside the House
Yellow or brown water stains on the ceiling near the chimney or fireplace wall
Bubbling or peeling paint around the chimney chase, fireplace, or TV wall
Soft or swollen drywall that feels spongy when you touch it
Musty smell near the fireplace or in the room below the leak
Cracked or loose baseboards around that wall from moisture wicking up
On the Roof & Patio
Broken or slipped tiles around the chimney
Cracked, rusted, or missing chimney flashing
Old, dried, and cracked roofing cement smeared around the chimney base
Rust stains or soft spots on the patio roof where it meets the house
Water dripping from patio ceiling, fans, or recessed lights after rain
If you see any of these, the leak has already started. The water usually runs along wood, paper, and framing before you ever see it. The faster we open it up and repair it correctly, the less you’ll spend on wood replacement, drywall, paint, and mold cleanup later.
Why Chimneys Leak on Las Vegas Roofs
Chimneys and roof penetrations are the #1 weak point on almost any roof. In our desert climate, the sun cooks sealants and underlayment year after year until they fail.
Here are the main reasons we find chimney roof leaks:
Old or Damaged Underlayment (“Paper”) Around the Chimney
On tile roofs in Las Vegas, the tile is not waterproof. The real waterproofing is the underlayment (the “paper”) underneath. Over time:
Underlayment dries out, cracks, and rips
Water runs under the tiles and finds the easy path: around the chimney and into your house
Wind-driven rain pushes water into any loose area
When we open the roof around the chimney, we almost always see brittle paper and sometimes rotten plywood that has been wet for a long time.
Failing Chimney Flashing
Flashing is the metal that seals the transition between roof and chimney. Problems we see:
Bent or improperly installed flashing on the “uphill” side of the chimney
No counter-flashing cut into stucco or masonry (they just smeared cement)
Flashing tucked behind stucco foam with no real waterproof detail
Rusted or pin-holed flashing letting water in every storm
If the original builder cut corners or a handyman “patched” it before, water will find that weak spot.
No Chimney Cricket (Saddle) on the Back of the Chimney
On the back side of the chimney (the side facing up the roof slope), water slams straight into the wall. When there is no cricket/saddle to split and divert that water, it builds up and forces its way under the flashing and paper.
We often add or rebuild chimney crickets to handle heavy rains and keep the water flowing around, not into, the chimney area.
Patio Roof Tie-In Leaks
One of the most common Las Vegas problems:
You have a patio cover or flat roof that ties into the main house wall or chimney
The tie-in was done with no proper flashing or membrane
Water runs along the connection, then shows up in your patio ceiling, stucco, or interior wall
This is why you might see water in the patio even though the leak starts way up the roof near the chimney or where the patio roof meets the wall.
Our Chimney Roof Leak Repair Process
We don’t guess. We follow a full process to find the source, fix the roof correctly, and confirm with a water test.
Step 1 – Detailed Inspection
We start with a full inspection of:
The roof surface around the chimney, valleys, and patio tie-in
The chimney itself (stucco, cap, cracks, flashing)
The patio roof if water is showing under your patio
If possible, the attic area above the leak to see water paths, stains, and damaged wood
We take photos and explain exactly what we see, so you know it’s not guesswork.
Step 2 – Remove Tiles/Shingles Around the Chimney
To repair a chimney roof leak correctly, we usually need to:
Carefully remove roofing tiles or shingles around the chimney and valley
Save reusable tiles and prepare for underlayment replacement
Open enough area so we can see where water is really traveling
This is the only way to properly replace the underlayment and flashing instead of just smearing sealant on top.
Step 3 – Replace Underlayment (Paper) & Repair Wood
Once tiles are removed:
Cut out and remove old, brittle underlayment around the chimney
Inspect the decking (plywood) and replace any rotten or soft wood
Install new, high-quality underlayment designed for tile or shingle roofs
Extend the underlayment far enough past the chimney so water can’t sneak behind it
For patio tie-in leaks, we may also extend new underlayment up the wall and under the stucco system where needed.
Step 4 – Install New Flashing & Cricket (If Needed)
This is where many roofs fail. We:
Install or replace base flashing around the chimney
Add counter-flashing into the stucco or masonry when possible, or properly seal to existing details
Build or repair a chimney cricket (saddle) on the uphill side of the chimney to split and divert water
Make sure the flashing ties in properly with the valley metal and surrounding underlayment
On patio roofs, we may also add L-flashing or special transition flashing where the patio meets the wall or chimney.
Step 5 – Re-Install Tiles/Shingles & Finish Roof Surface
Once the waterproofing is correct:
Reset roofing tiles or shingles around the chimney
Replace any broken tiles
Ensure proper overlaps and alignment so water flows correctly off the roof
Clean up all debris so your property looks like we were never there
No stacked-up tiles, no sloppy cement piles, no random mess.
Step 6 – Water Test to Confirm the Repair
To finish the job, we perform a controlled water test:
Run water with a hose at the specific area that was leaking
Test in stages: low on the roof first, then higher, then directly at the chimney/patio tie-in
Check inside the house and attic to confirm no water is coming in
The goal is simple: when we’re done, your roof and chimney should handle storms without any surprise drips.
Chimney Roof Leak Repair vs. Full Roof Replacement
Not every chimney roof leak means you need a new roof, but sometimes the leak is a symptom of bigger issues.
When a Local Chimney Repair is Enough
A local repair around the chimney is usually enough when:
The rest of the roof underlayment is still in decent condition
The leak is clearly only around the chimney or patio tie-in
The roof is not at the end of its life (for tile roofs, underlayment is often done around 20–30 years)
In that case, we focus on a targeted chimney roof leak repair and save you from a full roof replacement.
When It’s Smarter to Plan for a Bigger Roof Project
You might want to think about bigger work if:
Your tile roof is 20+ years old and leaks are popping up in multiple places
We see widespread brittle underlayment and repeated patches
The wood decking is rotting in many areas
If that’s the case, we’ll give you two options:
Short-term chimney roof leak repair to stop the immediate problem
A plan and estimate for a future re-roof or re-underlayment project
You stay in control of the budget and timing.
Chimney roof leaks Showing Under the Patio Roof
Many homeowners call saying, “The patio is leaking. It’s probably the patio roof.”
Often the real problem is higher up on the main roof around:
The chimney
A wall-to-roof connection
A valley that drains toward the patio area
Water travels along:
Underlayment
Framing
Stucco
Patio beams
…and then finally drips where you can see it: from the patio ceiling, fan, or the edge of the patio cover.
Our job is to track the leak backward to the real source and repair it there, not just band-aid the patio surface.
Interior Damage – Drywall, Paint & Stucco Repairs
Fixing the roof stops water from coming in, but often you already have:
Stained ceilings
Damaged drywall around the fireplace or wall
Cracked stucco on the chimney or exterior wall
Baseboards or flooring affected by water
We can provide a separate estimate (or work with your other trades) for:
Removing and replacing wet drywall
Texture and painting to match surrounding areas
Minor stucco repairs around the chimney or patio walls
Many repairs are also needed for insurance claims, and detailed photos of the roof and interior damage help support your case.
Why Homeowners in Las Vegas Choose Us for Chimney Roof Leak Repair
Local, licensed contractor experienced with Las Vegas tile and shingle roofs
Special experience with chimneys, stucco walls, and patio tie-ins
We open the roof and show you photos so you see exactly what’s happening
We replace underlayment and flashing, not just smear caulk that washes off next storm
Full water test after repairs to verify the leak is gone
Honest recommendations: if a small repair is enough, we say that; if the roof is at end of life, we show you why
You get straight communication, before-and-after photos, and a clear scope of work.
How Our Chimney Roof Leak Repair Service Works – Step by Step
Call or request an inspection
We schedule a visit to check the leak area, roof, chimney, and patio if needed.On-site inspection & photos
We locate the probable source, show you photos, and explain the issue in normal language.Written estimate
You get a clear scope: remove tiles, replace underlayment around chimney, fix valley/patio tie-in, install new flashing, water test, etc.Schedule the repair
We pick a date and explain how long the work will take (most chimney roof leak repairs are 1–2 days depending on damage).Perform the repair & water test
Our crew completes the work, cleans up, and then performs a water test to confirm the leak is fixed.Before-and-after documentation
You receive photos of the damaged areas and the repaired roof and chimney – great for your records or insurance.
Frequently Asked Questions About Chimney Roof Leaks
How do I know if the leak is really from the chimney?
Short answer: you usually can’t tell from inside. Water can travel. But if:
Stains are closest to the chimney or fireplace wall
You see cracked stucco or flashing outside
Or the patio leak is directly below where the roof meets a wall or chimney
…then the chimney area is a prime suspect. Our inspection and water testing confirm it.
Can I just caulk or spray something around the chimney to fix the leak?
You can… but it usually doesn’t last.
Spray sealers and surface caulking are temporary band-aids. The problem is usually:
Bad or missing underlayment
Rusted or wrong flashing
No cricket on the back of the chimney
If the waterproofing under the tiles is failing, surface sealant won’t stop water long-term. It might even trap water and make things worse.
How long does a chimney roof leak repair usually take?
Most chimney roof leak repairs take one full day, sometimes two if:
There’s heavy wood damage
The patio tie-in also needs work
The area is large with complex valleys
We’ll give you a realistic time frame during the estimate.
Will you repair the ceiling and interior damage too?
We can provide a separate estimate for:
Drywall removal and replacement
Texture and paint matching
Minor stucco repairs around the chimney or exterior wall
Or, if you already have a painter or drywall contractor, we’ll coordinate with them so they start work once the roof is watertight.
Can chimney roof leaks be covered by insurance?
Every policy is different, but many insurance companies will look at:
Whether the damage came from a sudden leak or long-term neglect
How much interior and structural damage occurred
We can help by:
Providing photos of the roof and damage
Giving a clear scope of repair to show what’s needed
We don’t control the insurance decision, but good documentation helps.
Do you work on stucco chimneys, framed chimneys, and decorative “boxes”?
Yes. In Las Vegas we see:
Stucco boxes that look like chimneys
Framed chases built above the roof
Structures that just hide a flue pipe
All of them can leak around the roof transition, flashing, and stucco. Our focus is on the roof-to-chimney connection and flashing, which is where almost all water gets in.
How soon should I fix a chimney roof leak?
As soon as you can. Chimney roof leaks rarely stay small. With each storm, water:
Soaks the underlayment and insulation
Rots the plywood deck and framing
Grows mold behind walls and ceilings
Early repairs protect your roof structure, interior finishes, and your budget.
Area – Where We Repair Chimney Roof Leaks
We provide chimney roof leak repair, patio leak repair, and tile roof leak repair across:
Las Vegas
Henderson
North Las Vegas
Summerlin
Spring Valley
Enterprise & Southwest Las Vegas
Green Valley
Boulder City
If you’re not sure you’re inside our service area, just ask – we’ll let you know quickly.
Ready to Fix Your Chimney Roof Leak?
Water stains, dripping patio ceilings, and wet walls don’t fix themselves. The earlier we open the area, replace the underlayment and flashing, and test it with water, the more of your roof and interior we can save.
Call today to schedule your chimney roof leak inspection in Las Vegas, Henderson, or North Las Vegas, and get a clear, honest plan to stop the leak for good.
Related Roofing Services
Explore our roof repair services, roofing service options, or contact Presto Roofing LV to discuss your chimney roof leak.
5 essential checks when planning chimney roof leak repair
Ask the inspector to explain five areas: safe access, the surrounding tiles, the underlayment, flashing at the chimney transition, and evidence of previous repairs. These are discussion points for a property assessment, not instructions to climb onto the roof yourself. Chimney roof leak repair should follow documented findings and clearly identify any areas that remain concealed.
Before approving chimney roof leak repair, ask which materials will be opened and where the repair will stop. Request photographs that connect each finding to the proposed scope. If additional damage becomes visible during access, the revised work and price should be explained before approval. Keep those changes with your original estimate.
At completion, retain the invoice, repair photographs and written workmanship terms. Chimney roof leak repair records are especially useful where tiles will conceal the repaired detail. Ask what was checked and what remains outside the work. A repair to the chimney transition does not establish the condition of every other roof area.
If a symptom returns after chimney roof leak repair, report its location, timing and weather conditions to the responsible provider. Include the original invoice reference and safely taken photographs. An assessment should compare the new observation with the completed scope rather than assume that all water marks share one source.